Pages

Saturday, January 25, 2014

Crafty Individuals Sponsor Spotlight No. 3

Welcome to the third and final 'Sponsor Spotlight' for January.
We are thrilled to have Crafty Individuals sponsoring the challenge this month.


As well as a fantastic range of original design rubber stamps they stock papers, masks, dies and a whole array of other crafting must haves.

I felt incredibly privileged to be given the opportunity to work with a couple of stamp sets and rather got carried away! My choice of stamp sets were;


There is so much detail in each of these designs so to me it was important that they really take centre stage on my cards. Once I'd got a design that worked it was easy to replicate it for each of the four images.


For each of the sets I created an initial 'masterboard' using white acrylic paint as a resist and three complimentary Distress Inks to add blended colour.


It was a great way to produce both the backgrounds for each card and the base for each stamped image.


The detail in each image is so fine and the Jet Black Archival ink made each one pop over the coloured base.


The addition of some clear heat embossing and a coordinating border helped to make sure they became real focal points.


The script style used for each image was echoed through the use of Tissue Tape strips, drawing the eye and adding to the balance of the composition.


Using Black Soot Distress Ink on the edges of each background helped to compliment the stamping but seemed a little too harsh on its own, so I drew on white border lines.


As well as the obvious fact that you get two images for the price of one in each set, I love these sets because they are suitable for a range of occasions, both joyous and those which need to be more subdued (and are often quite tricky to get right). That means you'll get even more use out of them, an important thing to think about when you are adding to your stash.


I hope you've enjoyed this final spotlight into the delights of Crafty Individuals products. 
You haven't got long now to enter Claudia's 'No more shopping sins' challenge - you could be picked as one of our Top 3, be our Top Talent and get to display your work here at Our Creative Corner, or even win a wonderful prize kindly donated by Crafty Individuals!

Looking forward to seeing your creations and hearing those confessions!

Wednesday, January 22, 2014

'Tic Tac Toe' Top Talent

           
Welcome back to another Top Talent spotlight at Our Creative Corner!
  
    This month we are shining the spotlight on the winner of the 'Steampunk Tic Tac Toe' Challenge that was hosted by Claudia.

     Our Creative Corner is so pleased to be welcoming Sam from Craftart who won the Tic Tac Toe challenge with her amazing
Washi Balloon card.

     
     As usual, before we show you Sam's amazing creation - let's find out a little bit more about this very talented lady.......


 1.) Where do you live?

In the heart of the US heartland.  And I mean my house is really smack dab in the center!  I'm at the crossroads for North, South, East and West of this great country!  

2.) How long have you been crafting and what made you start crafting?

I've been crafting for as long as I can remember.  My parents and grandparents were all artistic and crafty, so it was something that I was surrounded by all my life.

3.) Describe a real life experience that inspired you artistically

Everyday life inspires me.  The mundane, the normal, the seemingly inconsequential.  The gentle flow of routine.  Everyday in the summer I have a hummingbird that visits my feeder.  This inspired my hummingbird card.

4.) If you could only use three craft supplies for the rest of your life, what would they be?  

Paper, paint and ink.

5.) What is the most useless item that you have purchased for your craft?

Ha!  My craft room is filled to the brim with treasures!  I never purchase anything "useless"!!  Seriously, I know this is going to come as a shock - but probably my color printer.  I thought I would use it to print lovely images, but I have never had the need.  Maybe someday in the future.  Who knows.

6.) Do you pre-sketch a design or do you just wing it? How long does it usually take you to make a project?

I usually wing it.  I have pre-sketched before, but that is rare.  I have some projects that take years, even decades to complete.  Other projects in just a few hours.  It all depends on the project and the complexity.  I'm relatively slow though.  I enjoy the journey, not the end product.  I realize this is very unusual.  I really craft for the process, not the result.  I don't know what to do with all the finished items that stack up in the corner and collect dust.  I'm open to suggestions!

7.) Are you a Spring, Summer, Autumn or Winter person? Do you feel you create better in that season?

Oh no!  This is hard because this is really a dirty little secret of mine.  I love being outdoors and I live in a climate that experiences the extremes, so fall and spring are my favorite times of year when temperatures outside are mild …. but the secret is - I always wish for horrible weather, whatever the season.  That way, I'm "stuck" indoors in my craft room.  :) 


 Sam has created a really stunning showstopper for us today.......This box is so gorgeous!


         Thank you so much Sam for being here today in the Top Talent Spotlight and designing such a beautiful project for us. It has been such a pleasure to feature your work.

     If you want to see more photos and details of how it was made, then please go along to Sam's blog Craftart and say "Hello" - I am sure she would love to see you there!


                    Would you like to see your work here in the Our Creative Spotlight?


You could be here as our 'Top Talent' with the spotlight shining on something you have created! All you have to do is enter Claudia's 'No more Shopping Sins' challenge. 
You could also be one of our Top 3 and there is even the chance to be 
the winner of the prize donated by Crafty Individuals! 
            
          There is one more week of Claudia's challenge left, so why not have fun creating!
    
   Don't forget that Jenny will be here on the 25th to show you her wonderful Sponsor Spotlight! We hope you will all come over to see what she has made! Jenny will be very busy next month as she will be back again on the 1st February with her challenge for all of you!


Saturday, January 18, 2014

Crafty Individuals Sponsor Spotlight No. 2

Hello and a joyful servus from Vienna!
Claudia here to shine another spotlight on some of our generous sponsors' products. This month our generous sponsor is:

http://www.craftyindividuals.co.uk/

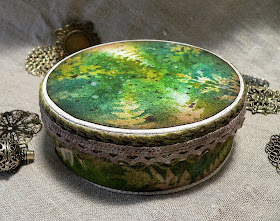
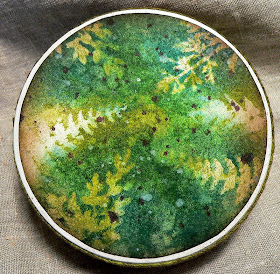
And this is what I came up with after a joyful play with some of the Crafty Individuals masks and various spray colour washes and mists in green and turquoise... an altered box:

.


I fell in love immediately with the two masks from Crafty Individuals: "Fabulous Ferns" and "Delicate Grasses". Not only do their names sound like a poem to me (I love it when language plays with its special "sound effects") but they also look absolutely gorgeous (and of course because I am a big fan of stencils).


 I took an image of the box as it looked before its alteration, the cut to size and already sprayed paper pieces, the used masks and the distress inks I used:


I am sure you will see them being used more often by me in the future - they are really gorgeous and as I love plants and especially the forest with all the wonderful ferns and moss, these masks have immediately become one of my favourites ;)
The image also shows the distress inks I used ("evergreen bough" and "walnut stain") and the ready to glue on paper pieces, which I sprayed in a large old shoe box to keep my desk safe and tidy.


I glued the cut to size, then sprayed and inked paper circle and strip to the box and added two layers of ribbon to the side of the lid for some texture.

As they were too "clean" and did not look enough "forest-ish" to me, I gave the ribbons a treatment with a heavily diluted Adirondack "Espresso" colour wash first.

When using the masks to create the paper pieces, I always put some heavy screw nuts on them to hold the masks and the paper down as the paper tends to curl as soon as it gets wet from the sprayed on washes and mists (and then the masks don't cover the paper properly any more)!


I also covered some areas with torn to size paper scraps to save some white spaces for the second layer.

After the first, sprayed on layer had dried, I added a second by simply laying the masks on the paper and applying Distress Ink on and around them with a blending tool.
See to it that you create some overlaps - this creates more  depth and the impression of wild forest growth.

Then I gave my "forest" some spritzes of water for a weathered look.

For a finish I sprinkled some Mr. Huey's "Opaque White" and some more Adirondack "Espresso" colour wash onto the image. Done.


I hope you like my tiny "forest box" and are inspired to create your own forests at home ;)
And don't forget about our actual challenge "No More Shopping Sins", where we want you to show and use some long hoarded and never before used items to get rid of your secretly gnawing hoarders guilt ;)
Hugs and happy crafting,
Claudia x

Saturday, January 11, 2014

Burlap meets steampunk distress style


Welcome back to Our Creative Corner!

Being this month's challenge host of our "No More Shopping Sins!" challenge, I have also the great pleasure to introduce to you our Guest Designer for January......

Trace Metcalfe from inkypinkycraft


      Trace is an artist who you all probably know very well and I am sure she will have inspired you many times before with her amazing creations. She is with us this month to add her magic to my current challenge with her gorgeous Steampunk design!

  Welcome to Our Creative Corner, Trace, we hope you enjoy being here as much as we enjoy having you with us!   


*********************************************


Well to say I am thrilled to have been asked to be a Guest Designer is an understatement. Some time out from blogland meant this was later than planned, but thanks for your patience ladies xx 

   So here I am and Claudia's theme this month is 'No more Shopping Sins' - using some much loved but never used piece of stash. 

     Now I am a huge fan of Mr Tim Holtz and adore so many of his gorgeous goodies, from stamps to idea-ology and of course, the amazing Distress range. So I do have a teensy habit of acquiring lots of his goodies and then feeling they are almost too nice to play with. So my stashed item, much loved but never used, is the new burlap panels...

Oh wow these are fab. The only trouble is I know need MORE! So here is my Guest Design make :


I have chosen some of my much loved and very well used Steampunk style stamps from Tim Holtz, some designed by Brett Weldele, lots of scrummy idea-ology, distress paints and got playing.
All 3 panels are done in a similar way and are actually fairly simple.

I started by adding some Distress Paints in Pumice Stone, Picket Fence and Black Soot to the base of the burlap panels...these are so fab as the backs are solid allowing none of that caving in that can occur with stretched canvas pieces. I added water and heat dried allowing the paints to do their magic. 


I then added some strips of tissue tape.

Now for the designs on the top. I created some textured pieces, using metal foil tape which was stuck to card and embossed and the distressed using Black Soot distress paint. I tore the edges as I like the effect. Hopefully you can see it peaking out behind this fab steampunk gent!


Panel 1
 

The image was stamped in black archival and coloured using waterbrush and distress markers. Then I went to town adding lots of my much loved stash of idea-ology. ( including some packs not opened like these fab word bands)

Panel 2
 
This was completed in same way as Panel 1.


Panel 3 
Here the image was stamped and colour added using Distress Ink, with colour removed from the gents faces using a waterbrush.


Well, all that remains is for me to say a huge thanks for having me along and hope you have liked my burlap panels. They are so much fun to create and it is amazing how much detail and texture you can add in such a small place!


Wednesday, January 8, 2014

A Very Vintage Christmas - Winner and Top 3

Hello everyone!

     Laura here to bring you the winner and Top 3 from my 'Very Vintage Christmas' Challenge.

   
  Thank you to all who entered this challenge - I am so glad you all embraced the lack of red and green and designed such gorgeous neutral toned creations. This was such a difficult decision because all of the entries were amazing and very beautiful! I loved visiting all of you!


My choice for winner of the 'Very Vintage Christmas' challenge is -


I really love what Ana has created here. A beautiful altered box - It has a gorgeous vintage feel yet has some lovely contemporary touches too. I adore the texture she has added, the sewing detail and the layers. It looks wonderfully festive! She describes it as 'Christmas Chaos' on her blog - If that is so, then for the first time ever I have found a chaos that I love!


And my Top 3 (in numerical order)

No 20 - 2amscrapper


This is such a gorgeous tag! I love the layers the delicate detail of the lace and buttons. I also really like the fact that it still looks so festive without having used lots of traditional Christmas images.


This is such an amazing creation - so much work and detail has gone into into this and the result is beautiful. I love the use of the gilding flakes and the distress effect gives a stunning vintage look. 


No. 40 - Stempelomi

.
 This is such a beautifully designed festive tag! The layers of inks and stamps all make up a wonderful tag. The vintage text is gorgeous too and I love the way the flower has been created.


Well done to the winners - grab your badges and we hope you will display them on your blog!

Remember there is Claudia's 'No more Shopping Sins' challenge running this month - Join in and you could be our Top Talent here at Our Creative Corner or one of our Top 3! You could even end up with a wonderful prize from Crafty Individuals!

.....And don't forget to come back on the 11th when we have the honour of introducing another wonderful Guest Designer to give you further inspiration for the current Our Creative Corner challenge.

See you then! - Happy Crafting!


Saturday, January 4, 2014

Crafty Individuals Sponsor Spotlight


  Welcome to Our Creative Corner's very first 'Sponsor Spotlight'. 

Our sponsor this month is Crafty Individuals


 Crafty Individuals is a company that the OCC team are thrilled to work with. Their stamps are amazing and it is well worth checking out their website to see what crafty goodies they sell!


    For this creation I chose two sewing themed stamps -


  I loved making this - total comfort zone - I adore sewing images, so I was thrilled to be able to make something with these two beautiful stamp sets

     I decided to have the colour scheme of Coffee and Teal - and I got to work creating the picture for the frame. This was going to be filled with stamped images in a collage. I stamped the images with Potting Soil Archival ink and used a mix of Frayed Burlap and Vintage Photo DI - my two favourite 'vintage' inks!
 

    I cut out all the images and arranged them onto a sheet of card....I planned to have the sewing machine on the frame so I cut that out to show the detail of the stamp.


   Now to work on the frame. I covered two opposite corners with texture paste and in the corners I began to draw swirls with a cocktail stick. as the swirls moved outwards I made them smaller then finally patted the texture paste with a palette knife to blend it in.


      I left this to dry and then painted the entire frame with Vanilla Fresco paint. When this was dry I brushed Decoart Crackle glaze over the untextured parts of the frame.When the cracks had appeared and the frame was dry I rubbed some Chocolate Pudding Fresco paint into the cracks and wiped with a baby wipe.


     I added a metallic sheen using Treasure Gold Classic Gold and White Fire - this gave a more antique look to the frame.


 I added the sewing machine to the frame and also some white roses that had been dabbed with Walnut Stain DI.


          The 'swirl' effect is shown really well here - I dry brushed Chocolate Pudding Fresco paint over the swirls and then brushed some Treasure Gold over the paste. This really highlighted the texture.


      Normally I wouldn't have used such a dark ink on the roses - but I felt it looked right for this - fitting in with the brown tones and adding drama to quite a pale creation. A few teal and brown coloured buttons were added along with some leaves and a rose that had been layered with gesso and Dylusion's Dirty Martini and Calypso Teal and water spray (repeatedly! - I totally lost count!)


     I added some tissue tape as well........


     Crochet lace was a suitable addition for a sewing themed creation.

     And one final touch...a sprig of dried Grape Hyacinth....


        I really hope you have enjoyed the first Our Creative Corner Sponsor Spotlight - there will be two more Sponsor spotlights this month featuring Crafty Individuals products and these spotlights will be hosted by Claudia and Jenny.

   Don't forget about Claudia's 'No more shopping sins' challenge too...you could picked as one of our Top 3 or you could be our Top Talent and show your work to everyone here at the OCC....and don't forget - one of our lucky entrants will be picked by Random.org and receive a wonderful prize kindly donated by Crafty Individuals!

        So what are you waiting for?.....Dig out those shopping sins and join in the fun!