Pages

Sunday, March 29, 2015

Goodbye...


    We are sadly saying goodbye to two members of our team today. This month was Pamellia's final appearance at OCC as a DT member and next month will be Astrid's final appearance with us.

   Their total commitment to team work and the loyalty, kindness and support they both provided to everyone at OCC will be very much missed. Their inspiring creations will also be very missed, not just by the DT, but by the OCC audience as well....

   We are so very happy to know that they are not going to vanish completely from blogland. They are just going to be taking the time to focus on other things.

   We would like to thank both Pamellia and Astrid for bringing such inspiration to you all. They have been such a wonderful part of our team and we would like to share with you a look back at some of their wonderful work and enjoy the inspiration all over.......We hope you will join us in wishing them lots of joy and happiness for their future crafty adventures....


Pamellia


Astrid


Love from the OCC team
xxxx


Wednesday, March 25, 2015

A Most Manly Case of Metal

Servus, dear friends of the stave rhyme and of Our Creative Corner!

This month I want to share with you a most manly make. I needed a box for my sister's longtime companion's birthday present and as he is the kind of guy who likes cars, bikes and loads of other manly stuff I decided to create a metal case to put his birthday present into.


It is a rather simple creation (and tutorial) this time - but sometimes less is more and I also found that with moving on to new techniques and media one tends to forget about the "golden oldies". Well, silvery metal oldies (but goodies) in this case. lol And that's a shame, isn't it? So back to basics it was and I really enjoyed creating my tiny metal case!

Materials I used:

heavy white card (200g/m2), A4 size
a suitcase template (either a tracing template or a printed one - for various templates click HERE)
metal ruler
craft knife
cutting mat
scissors
glue
Brushed Pewter Distress Stain
Carbon Black DecoArt Traditions acrylic paint
soft flat brush
kitchen towel
letter stamps and black archival ink (or StazOn)
Spellbinde
Sizzix Big Shot
MDF laser cut tag
chipboard gear
ball chain
(heat tool - optional)


1. Using my template and a pencil on an A4 sheet of heavy printer paper I traced the shape of my suitcase and cut it out. You can as well print out a suitcase shape on your computer. To find various templates click HERE.

(click images for enlarged view)

2. To get neat folds I lightly scratched along the folds using a craft knife and a metal ruler. Make sure you don't cut right through your paper (= don't press down at all...just let the knife "lightly scratch" along) and do this on the side that will be on the outside of the fold!


3. Then I ran my cut out and prepared suitcase through my Sizzix using the Spellbinders M-Bossabilities "Industrial" embossing folder. I had to do so twice as I could only emboss part of my suitcase at a time. Try to avoid embossing one area twice as this will create a "smudged" pattern by aligning your suitcase shape accordingly with the embossing folder.


4. The quickest way to paint my suitcase was to dab on "Brushed Pewter" Distress Stain generously and dry with a heat tool.


5. To tone down the silvery sheen and make my suitcase look more grungy I dry brushed on some Carbon Black acrylic paint using a soft brush. To do so just lightly load your brush tip with some paint and wipe off most of it on a dry kitchen towel. Then gently swipe on the "residue" from your brush. This will create great contrast and make the embossed pattern more visible.


To show you the difference and effect of the dry brushing I took a close up that shows the upper area being dry brushed whereas the lower section is still untreated:


6. Then it was time to fold my suitcase and glue it together.


7. As embellishments I added a lovely That Craft Place laser cut MDF tag and a chipboard gear that were treated with Distress Stain and acrylic paint to make them match the look of the suitcase.


I dabbed on the black acrylic paint around the edges using my fingertip (you know me, right? lol) but if you don't want to get messy you can of course use a bristle brush or a permanent marker.


 8. The recipient's name was stamped onto the tag using my all time favourite Hero Arts letter stamps and archival ink. If you want a more opaque look I recommend you use black StazOn ink instead.


9. The edges of the suitcase were treated with black archival ink using a piece of cut 'n dry foam. Tag and gear were fixed to the filled and closed suitcase with a short ball chain.


Done!


I am always surprised by how a little paint can make ordinary paper look like real metal...shiny, heavy and edgy!  I hope you like my rather quick and simple make for a man! What else would be a better gift wrap than a marvelously manly metal suitcase!


Hugs and happy crafting,

Claudia 
xxx


Sunday, March 22, 2015

Christmas Leftovers Top Talent

Welcome back to another Top Talent spotlight at Our Creative Corner!

This month we are shining the spotlight on the winner of the Christmas Leftovers Challenge that was hosted back in January by Pamellia!

Pamellia selected Sara as her winner and so we are thrilled to be welcoming her as this months Top Talent!!!

 Before we show you Sara's wonderful creation,  let's just spend some time finding out a little bit more about this creative lady..... 


 1. Where do you live?

 I live 15 minutes from the most beautiful beach on the Eastern shore of USA in Wilmington, NC.


2. Are you a spring, summer, winter or fall person? Do you feel you create better in that season? 


 I am a "fall person" with out a doubt! I can safely say my creativity peaks during the fall--just look at my prolific Halloween posts!


3. How would you describe your art for the general population audience if they have never seen it before? 


I let my kids answer this for me and they said "FAB U LOUSSSSS!" Seriously, I would say mixed media vintage/eclectic.


4. What, if anything, do you consistently draw inspiration from? 


Nature, yard and estate sale cast offs and Tim Holtz' blog--not just from him, but from all the bloggers who enter his challenges.


5. What is the one tool you couldn't do without? 


Easy.........my distressheatinkblendingtoolsandtweezerspapertrimmerwaterpen.


6. How do you spend your time when not crafting? 


 Cleaning up the mess I've just made, taking care of my spiritual self, my family, my home/garden, gardening, going to every yard and estate sale I can fit into a Saturday morning, exercising and working my 3 jobs. I also love entertaining and being with my friends. I stay busy! Did I mention Halloween--it is not a day for me-it is a 2 month event.


7. Any inspiring words you can share? 


If you love to make art or craft--DO IT! Never worry about what others think about your work--if you love what you do, others will love it, too! AND "embrace imperfection!"


***********************************


Thanks so much for being here Sara! We are so glad to have you join the OCC team and so proud that you could are here today as our Top Talent

     ....So now it is time to shine the spotlight on the Top Talent creation -  let's see what Sara made for us!


How wonderful Sara! - this is amazing! It really has been such an honour to feature this wonderful creation at Our Creative Corner.
 

Thank you so much for being such a wonderful Top Talent!
 
If you want to see more photos and details of this wonderful creation and find out how it was made, then please go along to Sara's blog and say "Hello" - I am sure she would love to see you there!


***************************************


Would you like to see your work here in the 'Our Creative Corner' Spotlight?
You could be here as our 'Top Talent' with the spotlight shining on something you have created! 

All you have to do is enter the 'Junk in your Trunk' challenge and if you are picked as the winner you will be invited to appear here as our Top Talent and have the spotlight shine on something you have made. We will also ask you some questions so that we can be nosey find out more about you....


Happy Crafting! 
Laura xxx

Wednesday, March 18, 2015

Crafty Individuals Sponsor Spotlight No.2

Hello everyone!
 Lys here,  introducing the second Sponsor Spotlight of the month


Crafty Individuals can provide you with many crafting supplies, especially rubber stamps, like the ones I chose (and it was difficult to choose).


 They are very precise and I love these vintage designs!
Let me tell you the story of how they inspired me....

Three ladies go out shopping and here they are in front of their favourite dressmaker shop: 


They admire the red one in the showcase, shining and new,


But they know that everyone can get a unique one, thanks to the many available patterns


Anyway the measuring tape can be thrown in a corner, as it's not a matter of length


Only their inner beauty can make them shine, and every lady can think that for herself


So they dream...why not go further and spend a night in Paris?


**********************

Well, getting down to earth, this is the process: I took an empty chocolate box


In order to use both parts of the box, I first used alcohol inks instead of thick layers of paint, but I changed my mind several times and finally I only kept the drawer.

So I tried to make this flashy pink softer, and with a mix of terracotta and denim , this is how it turned out. I also used Stazon on stamps on the outside but I forgot to take photos.
I put a piece of lace fabric on the back and tinted it with Vintage Photo to make it less white.


I stamped the images on white or kraft cardstock and coloured the ladies with a mix of Neocolor II and Adirondack raisin (yes I know I am not very academic, I try things until I am happy).

Spots of Glossy Accents are put on the red dress.


I would love to know if you like this. 
I loved working with Crafty Individuals stamps and I am sure you would too....

So join Candice's challenge 'Junk in your Trunk' and you could be the lucky winner of a Crafty Individuals prize!

Have a nice crafty time!

Lys.


Wednesday, March 11, 2015

Junk in your Steampunk Trunk

Hi there everyone.

I am so excited to introduce to you the amazing Belinda of Bella's Scrappin Place.

With an originality of note in her creative enterprises and inventiveness in her approach to art materials, supplies and tools - she quickly caught my admiration in the crafting blogworld.
I always love reading her blog, where she makes and shares fantastic things.   I was thrilled to find out that she is a fellow South African like myself and that she teaches art and craft at her studio in Cape Town.  Recently she has joined the U-stream circuit and made her creativity and ideas instantly accessible to anyone, anywhere.

Without taking much more time I am going to hand over to her to amaze you with what she has come up with. I know that you are going to love it.


***********************************************


I am very excited to be invited here as Guest Designer by Candice and accepted her challenge of using the Junk In My Trunk!

All I can say is that I must have been a magpie in a previous life!  I cannot pass by an interesting object or product without it coming home with me for the sole purpose of making something out of it eventually.  I am always on the lookout for things I can use in ways that were never their original designers intention!

Therefore, I have various trunks from big to small to scratch through for this project.

I eventually settled on my mini trunk of keys and my general trunk of useful items to raid for this project.

As an art teacher I land up with many sample canvases which I have used in my day to day classes to show paint techniques on, so I decided to recycle one of the 12"x12" ones into a steampunk creation using the "DIY" straws which I found at our local Mr Price Home Store in the entertainment department.  When I bought them about a year ago, I knew that they needed to become copper pipes on a project, quite when that was going to happen was debatable, until Candice invited me to do this challenge!  Sometimes one just needs a little nudge to get going!


They are meant to be used for drinking straws as a fun party idea.  However, after a light coat of copper spray paint they soon looked like real tubing!


I then set about laying out the cogs, clocks and various items I had in my stash to see what needed to be glued down before adding some distress paint.  The white clock is a Sizzix die by Tim Holtz and the manila cogs are by Spellbinders.  The embossed clock is a Couture Creations folder called Renaissance which I cut out by hand after embossing it.


Below you can see the wet distress paint which I added over the top of the glued die cuts.  The paint looks very different when it dries.


Here is my mini trunk of keys.  I took out my two favorite ones and made a silicone mold of them and poured some polyurethane into the molds and made my own keys.  This way I can use them again and again and again!  The brown ones in this photo are the originals and the white ones are the molded ones.  The nice thing about the molded ones is that they have flat backs and glue down so easily to a canvas or project.


I used ordinary acrylic paint in raw umber to paint the keys and then when they were dry, I lightly brushed them with some Inka Gold gold cream paint by Viva to bring out their textures and patterns.


Once the spray paint was dry on the tubing, I used a paint brush with my distress paint in Gathered Twigs and Black Soot to give the pipes a more aged look at each joint.


Having made all my embellishments, I glued the whole lot down and added some rusty buckles and studs from my general trunk for added interest as well as some distress inked and Rock Candy crackled Tim Holtz Sizzix cogs cut from left over mount board for added texture and depth.


I could make a canvas/project a week for the rest of the year and not use up all the junk in my trunks...I think I feel a personal challenge coming on!


 *****************************************

Holy Steampipes Belinda, I had no doubt that you would come up with something incredible but this just blows my mind. What an amazing transformation.  I can hardly believe you took that and made it into THAT. Totally loving it.


I hope that seeing Bella's wonderful Steampunk creation will inspire you to come along and play with us this month.  

Remember, we're looking for creations made with JUNK items - lets see them remade into works of beauty!


You have until 28th March to play - and you'll find all the challenge details here as well as lots of inspiration from the brilliant Our Creative Corner design team...
Happy Crafting!

Sunday, March 8, 2015

Crafty Individuals Sponsor Spotlight

Hello & Happy weekend!!  It's me Shari and I'm very happy to be here with you today showcasing our March Junk in Your Trunk Challenge sponsor-Crafty Individuals!!
For a randomly drawn participant of Candice's challenge this month, they will receive a surprise box of goodies generously donated by Crafty Individuals!  So, come on!! You've got to be in it to win it!! 
Now, let me show you what I created using two Crafty Individuals stamp images.
I'm going to be using this Crackle Background (CI-116) and the 3 Wise Gentlemen (CI-077) images for my project.... 
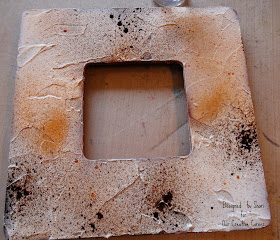
.....This altered wood frame! 

I started by painting my unfinished frame with some burnt sienna acrylic paint. 

Then I spread a layer of white embossing paste over the painted frame and let that air dry. 

When the embossing paste was dry, I spritzed some Tea Dye and Walnut Stain Distress Spray Stains over the embossing paste.

Then I spritzed the stains with some water to get them blending and heat dried.

Here is the frame with its textured, stucco-like surface.  Now time for some stamping!

I randomly stamped the Crackle Background image onto the surface of the frame with Potting Soil Archival Ink.  Other than some paint splatters that will be added later, this is all I did to the frame itself.
This is the background panel I'm going to use to insert into the frame.  I treated it the same as the frame-Spritzed with Tea Dye & Walnut Stain DSSs, spritzed with water, then heat dried.  I'll do all of my stamping and layering on this background. 
Look at these dapper gents!  I stamped the 3 Wise Gentlemen image many times onto mixed-media paper with Jet Black Archival Ink and heat embossed several of those images with black embossing powder.  I fussy cut the heat embossed hats and the arches in the background and adhered into place with matte multi-medium. 
With all of the stamping that I did of the 3 Wise Gentlemen image, I fussy cut and layered 3 of the 3's together.  I heat embossed with Vintage Photo Distress Embossing Powder, but wasn't happy with it.  It ended up disappearing once I positioned it in place.  So, I painted it with Tarnished Brass Distress Paint--I think it pops a little better now! 

This metal embellie is adorned with another piece of the 3 Wise Gentlemen image.  I water colored the image, fussy cut and adhered to the center of the metal medallion, then brushed a layer of Clear Rock Candy Distress Crackle Paint over the surface and let dry.  When it was dry, I rubbed Picket Fence & Tarnished Brass Distress Paints over the medallion.  I carefully heat dried, then rubbed Walnut Stain Distress Ink over it. 
I did stamp the 3 Wise Gentlemen onto my back panel for reference, but I layered the fussy cut images on top for a little depth.  I also stamped and embossed a couple more random hits of the Crackle Background image. 


And there you have our 1st Sponsor Spotlight of the month!  I really enjoyed working with these Crafty Individuals images and I can tell you now, it won't be the last time you'll see me using these! 
Thank you for joining me today-I hope my project has inspired you to reclaim a frame of your own and transform it for our Junk in Your Trunk challenge
Hope to see you there!!
XOXO-Shari