Monday, September 8, 2014

Summertime Winners and Top 3

Hi everyone!

Laura here to bring you the Winner and Top 3 from my 'Summertime' Challenge.

WOW! the entries for August were wonderful and each one was blissfully summery. Thank you to everyone for entering our 'Summertime' challenge and showing us what inspires you at this time of year.


First of all I would like to announce who won the summer themed bundle of goodies from our very generous sponsor last month Crafty Individuals


 The lucky winner selected by Random.org is 


Well done Hazel....please email us and we will send you the Crafty Individuals goodies. Have fun!


It is always difficult to choose a winner and Top 3 but finally I came to a decision and here they are.....


My winner of the 'Summertime' challenge is -


This gorgeous tag is so amazing! - I adore everything about it - the bright vivid colours, those stunning flowers and that wonderful bee all adds up to such a special summery creation. If you haven't seen this before then I suggest you hop over to see all the pictures and read how it was done - Bonnie has really created some very magical beauty here!


...and now for my Top 3 (in no particular order)


Ahhhh...A summer garden with lots of flowers. Total bliss! I love this card with it's gorgeous contrasting layers, delicate lace and those wonderful hand coloured flowers. It is such a beautifully designed card.


Julie's creation caught my attention straight away! We don't get many jewellery entries here at OCC and I thought this was breathtakingly beautiful. So full of summery colours, dazzling and so exquisitely detailed. 
Super work Julie!


This is such a fabulous tag book! I loved how much detail was in it and how superbly made it was. Those summery colours are just so beautiful and this will obviously be such a treasured keepsake.


Thanks to all who entered....it is such a shame I can't show more entries because there were so many I would have loved to have featured here today.
You could be here next month as our winner or Top 3 - Just hop over to Claudia's 'Autumnal Image Inspiration' challenge and have a go! You could even win a prize from this month's sponsor Tando Creative! 
Remember, you have to be in it to win it!

*******************************
Don't forget! We have more Sponsor Spotlights coming up on the 18th and the 25th so make sure you come back and see what has been made with items from our generous sponsor this month Tando Creative

This months Guest Designer is appearing on the 11th and it a post you will not want to miss!

....and last but by no means least...Julie is appearing as our 'Top Talent' this month...she will be here for her second appearance as 'Top Talent' on the 22nd!


Happy Crafting

Laura xxxxxxx


Thursday, September 4, 2014

September Sponsor Spotlight Number One - Tando Creative

Hello everyone. It's my turn to share a project I made using a product from our generous sponsors this month:

 Love using chip board? Look no further. . . . 
I chose to use one of Tando's house shaped advent calendar kits. Click HERE to go to the Tando site for more information and prices.

House Shaped Advent Calendar
The house comes flat pack and is then made up following the instructions.Now don't get worried - I'm not ready to make Christmas stuff yet! I've had my eye on this kit for a while though. I love the tiny drawers and the fact that you can decorate the piece in any way you choose.
Here's what I decided to do with my kit:


The drawers are just the right size for all those little bits and pieces which can roll around in a larger space and get in a terrible jumble (well mine do!)

The first job was to paint all the pieces - except the drawers - with two coats of gesso and sand lightly on the final dry coat. A stencil and some crackle paste was then used to add detail to the two end pieces of the house.
Once completely dry some random stamping was added in Archival ink. This was followed by various colours of DecoArt Media Fluid Acrylics as shown. The crackle paste areas were picked out using the wonderful interference paint in the same DecoArt line.
DecoArt Crackle Glaze was applied all over each end section. Antiquing cream in several shades was then applied to some areas of the crackle. Others were left plain.
The roof was given two coats of gesso followed by some DecoArt Modelling Paste through a stencil. Sorry, forgot to take the photo!
Half pearls were applied to the edges of the roof for interest and these had extra DecoArt Antiquing Cream added plus a little graphite pencil. As with the house ends, some areas of the crackle glaze were picked out with antiquing cream whilst the edges were sponged with Traditions paint to give them definition.
The draws are flat pack and they were given a coat of the Media Line gold which is just fab - rich with metallic pigment and a real joy to use as it looks so authentic.
Some stencilling was added to the drawers to make appear more interesting. Probably not entirely necessary but it's all in the detail isn't it?!! I used Stazon because I wanted to make sure it really did just that - stay on!!
The main structure of the house is made of gorgeous, thick chipboard and in comparison, the drawers are a little flimsy. I cut out some extra drawer fronts and stuck on die cuts which were trimmed to fit. Two coats of  gesso followed to give them a good surface for painting and more rigidity.


 The drawers were painted with various shades of Media Fluid Acrylics followed by some more gold interference paint on the die cuts. I love the look but it's quite difficult to capture in a photo. I think it shows quite well in the photo on the left though.


More stencilling was added with gold fluid acrylic followed by a layer of crackle glaze which you can see if you squint hard enough!
All twenty four (only twelve shown) drawers were painted with the same fluid acrylic colours. The Crackle Glaze was antiqued with some Traditions Acrylic (still love them!).
Some drawers had additional die cut flowers added with twists of rusty wire. The flowers were all painted with acrylics mentioned before.
Other drawers were left with just the original die cut details. The edges of the main chipboard structure were finished with a gold Krylon pen - I didn't fancy trying to keep a steady hand with a paintbrush on those narrow edges!


So glad I finished the sides of the drawers - plain grey board would not have been very exciting.
Lots of lovely rusty wire on the side sections and more die cut flowers.


So, there you have my non-Advent Calendar House from Tando! I love bright colours, die cut  flowers, rusty wire, paints and mediums and I think there's plenty of those to see here! What I also like is that this piece can be used too instead of just sitting somewhere to be admired.

Do have a look at Tando products if you haven't used them before as they really are very versatile.

Look out for two more Sponsor Spotlights this month from my very talented Teamies. Have you joined in with our new challenge yet? Click HERE to see all the details.

Thank you so much for visiting our blog today and looking at my project.

Monday, September 1, 2014

Autumnal Image Inspiration - OCC's September Challenge

Servus and welcome back to Our Creative Corner, dear crafting friends!

Claudia here to bring to you the new challenge and as autumn is fast approaching I decided to share some personal photograph impressions showing glimpses of our lovely Vienna vineyards and the beautiful Vienna Woods during this time of the year (which is my favourite time of year by the way ;).


(images and collage: Claudia Neubacher)

I challenge you to create a project inspired by this composition of images....either just a single one of them or any combination that inspires you. Be it a certain shape, colour scheme, texture, combination, contrast, effect, composition or theme you see in it - it is totally up to you to choose (and interpret) your source of inspiration from it - as long as you tell us about it in your post! 

 Our prize sponsor for this month is 


http://www.tando-creative.blogspot.co.at/


So don't miss the chance to win some of their awesome stuff by entering a project to our challenge!

My fabulous teamies whom I am so proud to work with have created a bundle of gobsmacking inspiration for you! They made me so proud when I saw what my photographs made them do for "my" challenge! (Thank you, gals! You rock! xxx)

But see for yourselves (and for a larger view just click on the images ...or click the names to get to their blogs to see more and leave one or the other comment there... we all like to get a comment now and then, don't we? ;):


I tried to bring every part of the inspiration collage into this creation!
It started as a piece of slate found in Devon, some tiny pebbles from Ilfracombe beach were added and after a few artistic tweaks I had a wall hanging which will always remind me of a perfect holiday.

**************************************


Nature begins up to the rest to put, it is cool, raining more frequently, and the wind blows mightily around the House. The autumn draws in the country. Harvest time, but also wonderful time, to pull back into the forest, to rustle through falling autumn leaves, to find mushrooms and uncover hidden secrets in the forest, when the morning mist of the meadows rises.
This was my idea for this mixed media project - Door to secret forest -

**************************************


The first thing that caught my eye in Claudia's beautiful photo grid was the fabulous glow of sunlight through the leaves in the centre.  I used some acetate to try to recreate the effect.  I also loved the glossy berries and all the twirly gnarly shapes and stems.  The whole piece is constructed on some driftwood to capture the textures of the bark.  

 **************************************


I got inspired by the beautiful colors!
The beautiful shades of green, a bit of silvery grey,
the dark blueberry blue and a touch of pink.

 **************************************

 Susan


I imagine that this is how my garden looks really early in the morning, when nature rules....

**************************************

I loved Claudia's image inspiration and knew immediately that I would choose to make something based on the central image of leaves. In addition, many of the colours in the other images inspired me, so I've tried to combine some of those natural tones with my own interpretation of leaves. I have altered a box received as part of a gift. I will use this box as gift packaging - I already know who it will be for! (but it's a secret)

**************************************

You can see why their makes make me so proud, can't you? ;)

I so look forward to seeing your interpretations and creations (that's the part I always love the most when hosting a challenge... as it is always very exciting for me to find out what you all "see" and create from the same source of inspiration - especially when this inspiration comes from photographs I took) !

As usual this challenge will be open until 11:55 pm on September 28th. If you want to find out who is among the winners and Top3 of our August "Summertime" challenge - hosted by the wonderful Laura, check back on September 8th! ;)

Hugs and happy crafting, 

Claudia xxx

Monday, August 25, 2014

Sponsor Spotlight No.3 - Crafty Individuals

Servus and welcome to Our Creative Corner, dear crafting friends, true followers and visitors old and anew!


Claudia here to invite you to our third Sponsor Spotlight for August! Today it is my turn and huge pleasure to introduce to you a lovely stamp set by this month's prize sponsor

http://www.craftyindividuals.co.uk/


I immediately fell in love with their gorgeous stamp set CI-207 "Ferns and Grasses":


and created this wall hanging for your inspiration:


First I started with stamping the single ferns and grasses with black archival stamping ink onto heavy white printer paper. I left enough space so each would fit with a separate rectangle (which I drew with a pencil and ruler).


Then I cut them all out. I didn't see to same sizes, so you don't have to measure exactly. It's the right angles for the panels we are looking for.


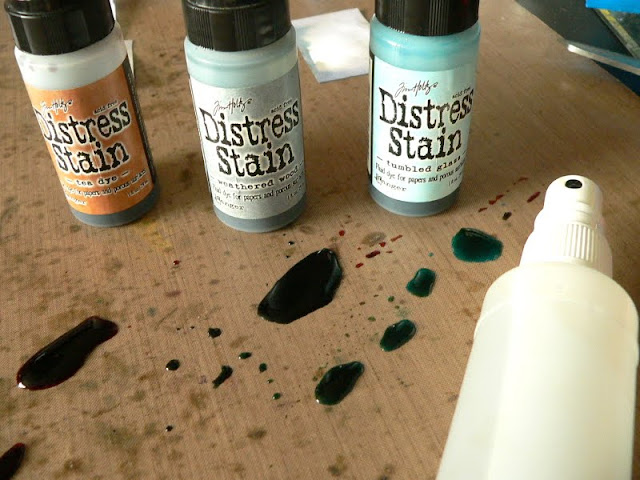
Next I applied three puddles of various Distress stains (Tea Dye, Weathered Wood and Tumbled Glass) on my non stick craft sheet.


Then I took the first of my stamped grass/fern panels and sprayed it with water from the bottle. Once my panel was slightly wet I randomly swiped its edges through the puddles...


...to create something like this:


I did so with all my cut out panels and set them aside to dry. Once they were dry they looked like this:


I love how the watercolour effect creates this "glow" in the centers of the panels!


Then I blended the edges of my panels with DI "Gathered Twigs" (using the ink blending tool).


After that I sprinkled on various colours from my colour spray collection to achieve a weathered and aged look:


For my background I used a square sheet of brown craft paper which I misted with water from the spray bottle and crumpled into a ball to create a highly textural surface to put my panels on.


Once this paper had dried I sprinkled on some paints too and made the creases more visible by applying DI "Gathered Twigs" to them.


I cut another square of the same size from some thick corrugated card (from left over packaging material) to mount my background to (using DecoArt matte Decou-Page).

Then I arranged my stamped grasses and ferns on the panel and glued them in place too. I also added some brads (from Red Lead) for more detail.


I still had one of those fab wood cut beetles (from Um Wow Studio), which I coloured with Distress paints (Wild Honey, Antiqued Bronze) and let dry.


Once it had dried I used my fingertips to apply some DecoArt Traditions "Raw Umber" to the edges and wipe it around. Before that colour dried completely I took some of it off with a soft cloth.


The beetle was glued in place with matte Decou-Page. As I had green and blue colour tones with my grass and fern panels I went for a contrasting colour with the beetle. This makes the greens and blues pop even more. 

The quote (from Hal Borland) was printed out on my computer, the words were cut out and the edges blended with DI "Gathered Twigs" before I glued them in place too.

It says "Knowing trees, I understand the meaning of patience. Knowing grass, I can appreciate persistence."


For a finish I added a piece of lace ribbon to the bottom of the wall hanging and a string of rough cord on top.


I hope you like my wall hanging! I leave you with some more close-ups and I also want to remind you of our actual challenge "Summertime", which is still open until 11:55 pm on August 28th!


Hugs and happy crafting, 

Claudia xxx