Showing posts with label 2016 Challenge Sponsors. Show all posts

Thursday, February 18, 2016

Darkroom Door Sponsor Spotlight #2

Hi There and Welcome Back to our 2nd Darkroom Door Sponsor Spotlight of the month! 


Today, our Sew and Sew Challenge Hostess Jan (found Scrapbooking from the Attic, from time to time), is showcasing a project in keeping with her own challenge theme.  


I was so excited when I received my rubber stamps from Darkroom Door.
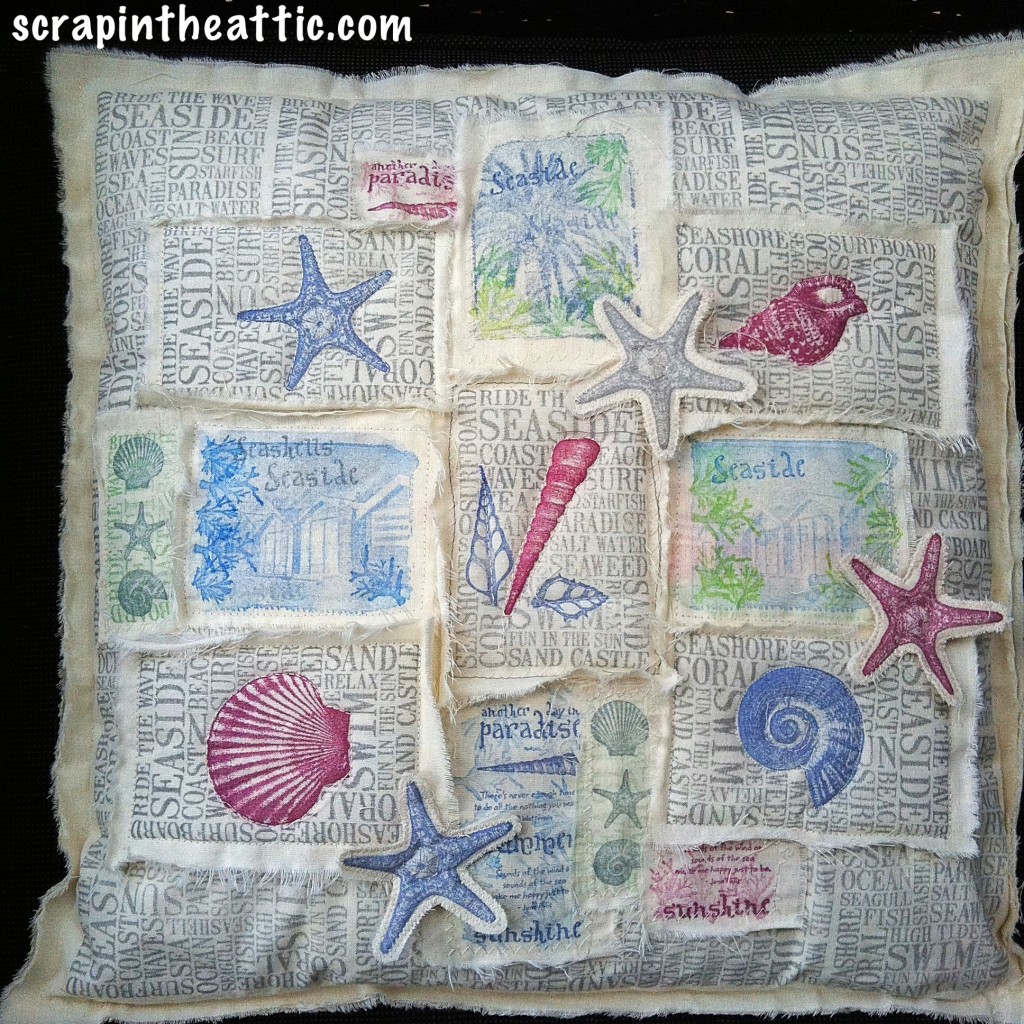
 The detail and stamping is beautiful, they are a joy to work with. I decided to follow the February Challenge theme and have an element of sewing. I wanted to create a patchwork effect to show off all the stamps, it ended up as a cushion!


I wanted a patchwork effect so I tore strips of calico (from my daughters stash!) I love how the fabric frays and reminds me of waves on the shore, perfect with these sea themed stamps. I used Archival Ink and was so thrilled with how the stamps worked with the fabric showing all the details.
I used masking techniques for the shell patches.
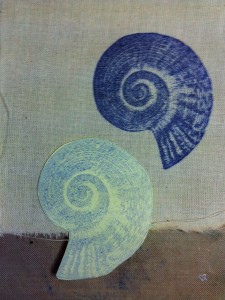

I stamped the shell onto the fabric, then onto a post-it which I cut out then positioned on top of the shell when I stamped the background. I heat dried the ink before stamping the background.


I created all the shell patches this way.
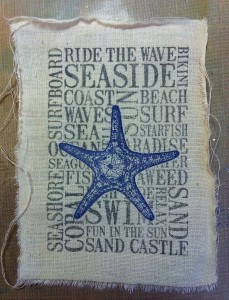

I enjoyed playing with the other stamps in the sets to create different effects, adding layers of stamping with the seaweed and translucent inks and repeat stamping. I tore some of these into smaller strips.
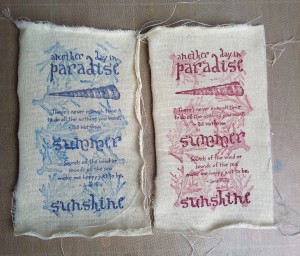

The photo stamps have amazing detail and I love the effect on the calico. I stamped seaside and seaweed stamps over the top to create more interesting layers.
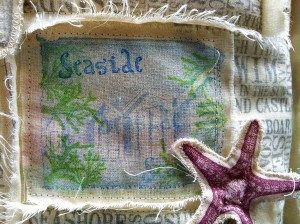

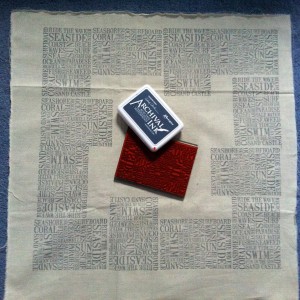
I used the background stamp in a repeating pattern on the cushion front. 
My cushion pad was 16 x 16 inches square so I started with a larger piece and tore the edges to fit when I had finished all the stitching.

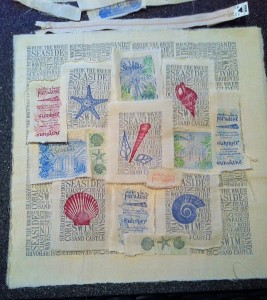
I stamped lots of patches of different sizes to play with to get the effect I wanted. I used a 14 inch zip at the base of the cushion. The shell patches were padded with toy filling before machine stitching to give them dimension. I hand and machine stitched around the shells to make them puff up a little. The other patches were sown flat onto the base. I folded the ripped edges so they were raised up and ruffled.

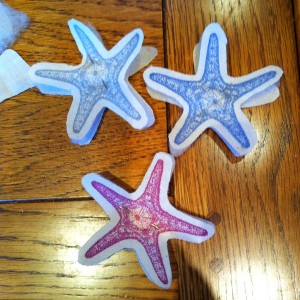
I wanted more layers so my favourite starfish was stamped, then cut out with a layer of padding and calico and machine stitched around the edge. I hand sewed them onto the cushion at the end.

I was so thrilled with the finished cushion. It reminds me of all of the holidays I have spent collecting shells with my children and granddaughter. I also remember all our lovely holidays in Australia where Darkroom Door is based. 

A huge thank you to Rachel for the opportunity to use her stamps.

You still have time to enter my challenge, Sew and Sew.  I hope this has inspired you to try something different.

Hugs Jan x

Such an Amazing sewn creation, Jan!  Your use of the nautically themed Darkroom Door Rubber Stamps to create this cozy looking cushion is just Wonderful! 

And like Jan mentioned, there's still time to enter your sewing themed projects into her Sew and Sew Challenge--there are 10 days left, 'sew' what are you waiting for?  Hope to see you there!


Monday, February 8, 2016

Darkroom Door Sponsor Spotlight #1

Hello and Welcome to our first Sponsor Spotlight of this new challenge month of February.  We are very happy and honored to have- 


-as our Sew and Sew Challenge Sponsor this month!  Darkroom Door is generously awarding one of our randomly chosen Sew and Sew Challenge participants with a Darkroom Door Rubber Stamp Set ($31.95 AUD value)!  The Sew and Sew Challenge is open until February 28th--plenty of time to bring your sewing related creations over.....
 
Now, without further ado, OCC DT Member-Extraordinaire Candice (aka Tincan Crafter) is here to showcase some amazing creations she made with one of Darkroom Door's fabulous Rubber Stamp Sets--
 
I have had a fascination with Japan and Asia since I was a little child.  In my twenties I was fortunate enough to spend about 7 years over in Japan in Nagasaki and Shiga.  So when Darkroom Door generously sponsored me with the awesome Kimono Vol. 2 Stamp Set - I was thrilled and decided to draw on that experience to do these.


The Collection as shown above, consists of two Kimono clad ladies, the "Kanji" for Love, a sakura laden tree branch, a fan and three "Mon" (a crest typically signifying a family clan).  I decided to play around with every element in the collection to create a set of 4 multi-purpose cards.

Here below, are the 4 cards with a little explanation of what I used from the collection--

 Kimono First Lady 

The focal point of this card is the lovely Kimono adorned lady who is looking behind her.  I stamped her onto card stock and coloured her in with ink.  I stamped the Kanji for Love onto a wood tile and heat embossed it.  I layered the image onto various mats of washi paper, added a few brads and some twine to finish it off.

Fan Box

I stamped the fan from the collection in three different shades of Archival Ink onto Flower Print Origami Paper and fussy-cut them out.  I used gold ink to create contrast along the edges of the fan.  I used a genuine piece of washi fabric to mat the fans in a vertical 3 pattern.  I drew in some branches and punched out tiny sakura flowers out of the same origami paper to adorn what I intended to look like a sakura tree branch. The card is a window box card - the idea was that it looked like the shrine corner in Japanese Houses.

Sakura Lanterns

Using the Sakura branch stamp and two of the "mon" stamps - I came up with a lantern type card.
I cut out a big circle from silk print cardstock, stamped the Sakura Branch onto it.  I then coloured in the image with an assortment of Sakura Gel and Glaze pens.  To make the base of the lantern - I cut out two rectangles - rounded off the edges and used Walnut stain distress Ink to colour it.  For the smaller lanterns - I die cut round tabs from the Cricut line of dies.  I stamped on two of the "mon" images.  

Leafy Kimono and Lanterns

I used all the "mon" stamps and the Love Kanji on the square lanterns.  I made those by die-cutting rectangles, rounding off the corners and running the big rectangle through a crimper.  I also stamped the Lady in the Leafy Kimono and coloured her in with Sakura gel and glaze pens.  I cut a window out of some cardstock and embossed that with wood grain design.  I glued on some Washi paper on the reverse side to create the effect of the lady entering through a washi door.

I hope Darkroom Door will be happy with what I have envisioned and created with this beautiful collection of stamps

I am having serious problems with internet connectivity right now so I am unfortunately unable to show you a photo-play-by-play on how I created each card.  However I do hope that you have enjoyed these cards and that you will head over to Darkroom Door and pick up this awesome collection as well as see what other amazing collections they have.

Thanks for stopping by to have a look at these.  Please leave me a comment if you would like better details or explanations of anything that you would like to know more about, in the event that you wish to recreate it.

Happy Crafting everyone!

(aka - Tincan Crafter)
 
WOW, Candice!!  You've truly brought your experience and knowledge of Japan to life in this Outstanding set of cards!  I know, that not only will Darkroom Door love these creations, so will our readers--Each card more is beautiful and original than the last. 
 
Thank you for joining us today, for our first Darkroom Door Sponsor Spotlight of the month.  We'll have another Spotlight on the 18th, so come back then and see another Awesome OCC DT creation using Darkroom Door images. 


Friday, January 8, 2016

Creative Embellishments January Sponsor Spotlight

Welcome to our first Sponsor Spotlight of this New Year!!  We've got our Our Creative Corner's owner, Laura, showcasing goodies from our January Challenge Sponsor-Creative Embellishments for you today--Take it away, Laura!!  


Hi everyone!

 I am so pleased to be bringing you our January Sponsor Spotlight. Our wonderful Sponsor this month is Creative Embellishments!


I LOVE the items Creative Embellishments make! They are so gorgeous and delicate - they are a perfect addition to any project you are making - and the choice is amazing in their store - every subject, size, variety...you will be spoilt for choice. They are kindly offering a wonderful prize for the winner of this months challenge.....see what I made with some of the items they sell....

    I chose to use a berry wreath and a bird from their chipboard range


I cut a circle card background for the wreath and covered it with German text paper


I then painted over it with White Acrylic paint and Iced Spruce Distress Paint to make the snow and sky background. I covered the snow area with glue and sprinkled it with Rock Candy Distress Glitter.

I painted the wreath with Burnt Umber Decoart Media Fluid Acrylic paint and painted the berries with white acrylic paint so the red will really show up well


I then painted the berries with Quinacridone Red Decoart Media Fluid Acrylic paint and when dry I added blobs of Decoart Liquid Glass to add a berry shape.


I dabbed the leaves, wreath and berries with white acrylic paint then covered the wreath with Rock Candy Stickles glue and sprinkled a little extra Rock Candy Distress glitter to add some lovely frosty texture.


Some rusty wire curls added some foliage texture to the whole wreath and a hanger was made of rusty wire too


The robin was painted with Frayed Burlap Distress paint and Ivory, Red and Burnt Umber acrylic paint.


 I stamped some snowflakes and diluted some white acrylic paint with water and splattered the thin paint over everything to look like snow.


Hope you like my Winter Wonderland Spotlight!

Come and join in with Claudia's challenge this month to be in with a chance to win $25 worth of Creative Embellishments goodies!

Happy Crafting!

Laura 
xxxxxxxxxxxxx

Monday, December 21, 2015

Announcing our 2016 Our Creative Corner Sponsors

Hello, Hello, Hello!!  It's me Shari, with you today as the International Sponsorship Coordinator for Our Creative Corner and I'm soooo excited to be introducing the line-up of Challenge Sponsors that we will have in 2016. 
Without further ado and in no particular order, may I introduce--


How AWESOME are these Sponsors?!  We have returning Sponsors; Creative Embellishments, Tando Creative, Crafty Individuals and Designs by Ryn and new Sponsors; Darkroom Door, Artistic Outpost and Lost Coast Designs/Carmen's Veranda.
Each month, we will have one of these Fabulous companies sponsoring our challenge with a generously donated prize or gift certificate that will be awarded to one of our randomly drawn challenge participants AND my fellow OCC DT-mates will showcase our monthly sponsor with our always popular Sponsor Spotlights. 

So, join us here at Our Creative Corner in 2016 to celebrate a whole New Year of Creativity, Inspiration and Fun!  Our 2016 challenge year begins on January 1, 2016, so how about making a New Year's Resolution that would be easy to keep, and give your creative side a chance in 2016?  We'd sure LOVE to have you join us for our monthly challenges and with this Spectacular line-up of Sponsors, it's a win-win situation any way you look at it! 

Hope to see you in 2016!!