
Claudia here to shine another spotlight on some of our generous sponsors' products. This month our generous sponsor is:

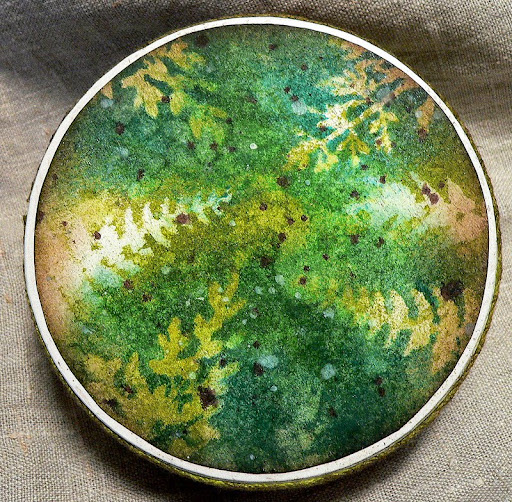
And this is what I came up with after a joyful play with some of the Crafty Individuals masks and various spray colour washes and mists in green and turquoise... an altered box:

I fell in love immediately with the two masks from Crafty Individuals: "Fabulous Ferns" and "Delicate Grasses". Not only do their names sound like a poem to me (I love it when language plays with its special "sound effects") but they also look absolutely gorgeous (and of course because I am a big fan of stencils).


I took an image of the box as it looked before its alteration, the cut to size and already sprayed paper pieces, the used masks and the distress inks I used:

I am sure you will see them being used more often by me in the future - they are really gorgeous and as I love plants and especially the forest with all the wonderful ferns and moss, these masks have immediately become one of my favourites ;)
The image also shows the distress inks I used ("evergreen bough" and "walnut stain") and the ready to glue on paper pieces, which I sprayed in a large old shoe box to keep my desk safe and tidy.

I glued the cut to size, then sprayed and inked paper circle and strip to the box and added two layers of ribbon to the side of the lid for some texture.
As they were too "clean" and did not look enough "forest-ish" to me, I gave the ribbons a treatment with a heavily diluted Adirondack "Espresso" colour wash first.
When using the masks to create the paper pieces, I always put some heavy screw nuts on them to hold the masks and the paper down as the paper tends to curl as soon as it gets wet from the sprayed on washes and mists (and then the masks don't cover the paper properly any more)!
I also covered some areas with torn to size paper scraps to save some white spaces for the second layer.
See to it that you create some overlaps - this creates more depth and the impression of wild forest growth.
Then I gave my "forest" some spritzes of water for a weathered look.
For a finish I sprinkled some Mr. Huey's "Opaque White" and some more Adirondack "Espresso" colour wash onto the image. Done.

I hope you like my tiny "forest box" and are inspired to create your own forests at home ;)
And don't forget about our actual challenge "No More Shopping Sins", where we want you to show and use some long hoarded and never before used items to get rid of your secretly gnawing hoarders guilt ;)
And don't forget about our actual challenge "No More Shopping Sins", where we want you to show and use some long hoarded and never before used items to get rid of your secretly gnawing hoarders guilt ;)
Hugs and happy crafting,
Claudia x
Oh wow Claudia, this is so amazing ly beautiful!! You have worked real magic wit those stunning stencils, what a transformation!! I absolutely love your chosen colours, nd the depth and beauty you achieved is incredible! Something like this would make the most amazing journal background too! This is so, so beautiful!! I now "need" those masks...... Beautifully photographed too by the way!
ReplyDeleteClaudia, this is a beautiful spotlight! I love what you have created here - the colours are gorgeous, and as Astrid said the depth is stunning! and yes, I NEED those masks too now! ;o) Lots of love from Laura xxxxxxxx
ReplyDeleteAMAZING Claudia! This shades of green are awesome to me and I love the ferns and this natural touch you have achieved ...
ReplyDeleteyou know I am Susi from Quater forrest -lol!
I can see why you needed those masks Claudia! Love the layers of misting and spritzing to create your decorative paper and the addition of that lace is perfect. Jenny x
ReplyDeleteGoodness gracious child - your box is stunning - a real keepsake and anyone who gets to keep it is so very lucky - I love it!
ReplyDeletesandy
What a makeover! The box is just stunning and thank you for all the technique ideas.
ReplyDeleteAn absolutely stunning make, Claudia - makes me long to disappear down a dappled path and lose myself in the depths of the forest - wonderful, wonderful!
ReplyDeleteAlison xx
What an amazing transformation Claudia, the colours are gorgeous and you have achieved so much depth with the masks - beautiful, beautiful work! Hugs, Anne x
ReplyDeleteoh my this is beautiful - love it - the colours for me are perfect xx
ReplyDeleteStunning! You have achieved not only the look of the forest, but also the little bits of light that come through. Thank you for your art!
ReplyDeleteLovely ... I love the movement you achieved by the rotational placement of the grasses and ferns on the lid. And yes ... they do sound like a poem :) -- Mary Elizabeth
ReplyDeleteThis sings of vibrancy and spring, gorgeous work Claudia. Nicola x
ReplyDeleteJust stunning Claudia!! I love the stencils you chose and the colours used. Beautiful. Juliaxx
ReplyDelete