

Boo!!!!
Erm...of course I mean "Servus and welcome back" to our third Sponsor Spotlight that's to be shone on some of the fab products you can get at

who are giving away a $25 voucher to one randomly drawn entry from this month's challenge "go RUST-ic!" (which is open for three more days)...so there is still a chance to join in and maybe even win! ;)
Claudia here to show you a project I made using some of the stuff Linda offers at her fab store, like Tim Holtz stamp sets, Claudine Hellmuth matte medium and Ranger products (crackle paint, archival ink, Distress markers, Distress inks).
As there is only one more week until Halloween, I decided to create a selfmade tombstone frame showcasing some of the adorable "Carved Halloween" stamps from the new Tim Holtz collection which I fell in love with at first sight!

Here's the list of materials I used:
- Tim Holtz stamp sets: Reflections, Carved Halloween, Poisonous
- Distress inks: peeled paint, black soot
- Distress markers: antique linen, frayed burlap, black soot, spiced marmalade, mustard seed, peeled paint
- Distress crackle paint "weathered wood"
- Distress paint "black soot"
- Ranger black jet archival ink
- Claudine Hellmuth matte medium
- a soft brush, some corrugated card from old packagings, scissors, a carpet knife
- slightly yellowed paper
- white Sharpie pen
- white card
- quote stamp
- sticky foam pads
- a piece of acetate
- baby wipes
- palette knife

Most of the stuff is available at Linda's Funkie Junkie Boutique - so have fun creating your own tombstone frames!
1. On a piece of corrugated card sketch the irregular shape of a tombstone and cut out using a carpet knife or scalpel. The height of my tombstone frame is about 28 inches and the width measures 7 inches at its widest (which is on the base).

Freehand cut out the inner part so you get your frame. There's no need to work very neatly - the more irregular our frame looks, the better!
2. Lay your frame onto some thin cardstock and draw around its shape. Cut out and glue behind your frame using double sided sticky tape in some areas.

As you can see I flipped my tombstone frame over as I liked it better this way.

3. Stamp two sheets of yellowed paper with the stamps from the Reflections stamp set using black jet archival ink and let dry.

4. Stamp the labels stamp from the Poisonous stamp set and cut out the single labels.


5. Tear the two stamped text sheets to stripes (one horizontally and one vertically).

6. Using the matte medium and your torn paper strips cover your tombstone frame working from the outside to the inside.


Make sure you glue the overlap securely to the back of your frame.

When glueing on the paper pieces, cover some of the areas on top with random strokes of the matte medium but do NOT cover the whole surface!!! We want the matte medium brush strokes to build a resist that will become visible with one of the following steps!

7. The last layer to glue on are the poison labels.Let dry.

8. Apply some weathered wood Distress crackle paint with a palette knife. Let dry.

9. Once it has all dried work in some black soot Distress ink with the blending tool.

Then wipe off the excess with a baby wipe. As we covered only some of the areas with the matte medium, the black soot ink will seep into those areas that are still uncovered. Wiping over these areas "activates" the distress ink and darkens it, whereas it will take away the distress ink from those areas that resist (due to the matte medium).

See how the brushstrokes become visible? I love the randomness that is to this technique as it creates really cool texture:
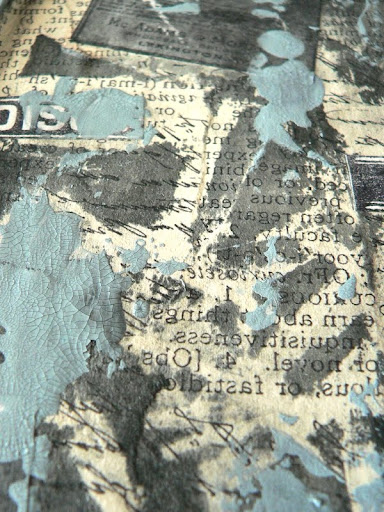
Also the reverse letters from the "reflections" stamps don't draw too much attention to them as they become more of a texture than text (which was why I decided to use them instead of normal script stamps).
10. Repeat this step using "peeled paint" Distress ink this time.

11. Dab some black soot Distress paint onto your craft sheet and apply it to the inner and outer edges of the frame using your fingertip. Be brave: try to work as unevenly as you dare to! Even visible fingerprints are welcome! ;)

Wipe off any excess on top of the crackled areas using a baby wipe. Let dry.

12. Stamp your images onto some white cardstock using archival ink. Colour with Distress markers. Then cut out.

13. Glue your cut out images in place using sticky foam pads.
Blend a piece of white cardstock with Distress inks peeled paint and black soot and stamp your quote onto it. Cut out single word panels and glue in place using the matte medium.

14. Take the black soot Distress marker and blend in the word panels by drawing a thin outline and smudging it with your fingertips. This will make your word panels pop from the background:

See the difference that makes?


15. Stamp the spider image onto a piece of acetate, let dry and cut out. Glue behind the top panel and fix that to your frame with sticky foam pads. The irregular shape of the top panel is the result of tearing it to shape instead of cutting.


I coloured my spider from the back using a white Sharpie so it became more visible.
Finished!
I would really like to encourage you on cutting your own shapes and having your "traces of the handmade and therefore irregular and imperfect" become a visible part of your artwork! It adds such a lot of depth and personality to your creations! And it also is what makes your pieces inimatable one of a kind originals!
I hope you enjoyed today's spotlight and leave you with some close ups and the reminder of our actual challenge that is still open until October 28th, 23:55 o' clock! Have a lot of fun creating and messing! Claudia xxx


GRANATENSTARK Claudia! AMAZING! Thanks for the step by step tut !
ReplyDeleteSpookily great!!
ReplyDeleteBrilliant!
ReplyDeleteLove
Amanda x
Great tutorial and creepy craft. Spooky!!!!
ReplyDeleteWunderbar,ganz wunderbar, liebe Claudia. Und so eine tolle Anleitung ! Vielen Dank! Glg margit
ReplyDeleteWhat a fabulous spooky creation!
ReplyDeleteWow megamäßig gruftig gut, ganz hervorragende Gestaltung, gefällt mir sehr. Auch deine To-do-Anleitung ist spitzenmäßig gemacht.
ReplyDeleteLiebe Grüße
Sabine
Fabulous project Claudia! I am not a huge Halloween fan, but I specially love how you created your stamped background paper, it looks just like printed paper, very cool.
ReplyDeleteThis is just amazing Claudia! I love the acetate spider, it looks like it's floating, super creepy! You're right, outlining the words with the black really DOES make a difference! Such a fantastic project! hugs :)
ReplyDeleteThank you Claudia for such a cool tutorial!! Your crooked tombstone is the bomb! I love it! xo
ReplyDeleteGreat details - wonderful tutorial! This is awesome! Love all the details in the artwork.
ReplyDeleteWhat a fabulous Halloween make - I love that layered background… brilliant!
ReplyDeleteAlison xx
Thank you for the tutorial, your project is stunning!
ReplyDeleteWhat fun!!!! I adore this. Great job with the tutorial Claudia. Love the tombstone. Fantastic idea for Halloween. Thanks for the inspirations
ReplyDeleteWow Claudia, this is a stunner! Technique packed and loaded with details. Wonderful step by step (of course!).
ReplyDeleteJuliaxx
Amazing project, I love it, thanks for sharing!!! Coco x
ReplyDelete